선택자 이어서 적기
3. 클래스 선택자
.클래스명{스타일}특정 선택자가 아닌 특정 클래스에만 적용을 시키고 싶을때 쓰인다.
예시)
<h2> 이건 제목</h2>
<h2 class="redtext"> 이건 뻘개요 </h2>
이와 같이 h2가 동일하게 적용되었는데 아래것만 적용시키고 싶을땐
.redtext{font:red;}이렇게 CSS문을 작성해주자.
4. 아이디 선택자
#아이디명{스타일}위와 같이 특정 아이디에만 스타일을 적용시키고 싶을때 사용된다.
사용법은 .이 아니라 #이라는 점 외에 위와 사용법이 동일하다.
5. 그룹 선택자
이름1, 이름2 {스타일}둘이상의 요소에 똑같이 적용시키고 싶을때 쓰이는 선택자이다.
스타일
스타일 선언 방법
1. External CSS : 별도의 외부 CSS문서에서 불러온다
cssExample.css 라는 파일이 존재한다고 가정해보자.
cssExample.css 내용
@charset "UTF-8";

body{
	background-image: linear-gradient(to left top, white , blue, red, indigo, white);
	background-repeat: no-repeat;
	}
이 파일을 불러 오는 것은 HTML의 헤드내에
<head>
<link rel="stylesheet" href="cssExample.css">
</head>
이렇게 작성해주면 된다.
2.Internal CSS : HTML문서 내부에서 HEAD에서 선언해준다.
<head>
<style>
	선택자 {css속성명:값};
<!-----------예시----------->
	p { background-color:red};
</style>
</head>
3. Inline CSS : HTML 문서의 태그 내에서 STYLE 속성으로 선언한다.
<p style="css속성명:값;"></p>

<p style="fontsize=10; background-color:red;"> </p>
이렇게 작성된 것들과 html 자체의 style 이 있어 이들에 대한 우선 순위를 고려해가며 css를 작성 후 적용시키자.
이때 최우선으로 적용해야할 것인 경우 스타일 내에 !important를 써주면 최우선이된다.
Style 내용 채우기
내용이 많으니 몇가지를 골라서 사용 해보도록 하겠다.
예시1
@charset "UTF-8";

body{
	background-color: AliceBlue;
	background-repeat: no-repeat;
	font-family: Arials, sans-serif;
	color:brown;
	}

h1{color:red;}
이렇게 작성할 경우
body부분에 해당하는 배경색은 aliceblue이며 no-repeat 으로 반복적으로 그려지는(바둑판식)것을 막았다.
font-family는 글씨체이며 color는 글씨의 색이다.
h1부분에 해당하는 글씨의 색은 red이다.
이런식으로 글씨의 색, 배경색, 글씨체가 적용된 것이 보인다.
예시2
h2{
	padding: 20px;
	border: solid blue 3px;
}
※특정 선택자에서도 id까지 이야기하려면 #을 이용하자
예시)
div라는 선택자 중에서도 id1을 가진 선택자만 고르고싶을때는
div#id1{
css내용
}
이와 같이 입력하면 된다.
Box model

박스모델은 내용을 둘러싼 여유공간, 경계, 공백 들을 말한다.
margin과 padding은 보이는대로의 여백을 뜻하며. border는 경계선이다.
Margin과Padding을 줌으로서 여유공간을 주거나 오히려 딱 붙여서 사용하여 효과적으로 컨텐츠를 보일 수 있다.
이때 이것에 대해 우리가 임의로 지정하는 방법을 살펴보자.
1. 해당 content에 직접 inline style을 지정한다
2. 해당 html의 head에서 맞는 style을 지정한다.
3. css문서를 통해 border의 style을 지정한다.
예시
<!DOCTYPE html>
<html>
<head>
<meta charset="UTF-8">
<title>Insert title here</title>
<style>
h2 {
	border-left-style:solid;
	border-left-color:black;
	padding-left: 20px
	}
</style>

</head>
<body>

	<h2>wowwow</h2>
	<table border="3" width="75%" align="center" bgcolor="blood">
	<tr>
		<th>컬럼의 이름은 1</th>
		<th>컬럼의 이름은 2</th>
		<th>컬럼의 이름은 3</th>
		<th>컬럼의 이름은 4</th>
		<th>컬럼의 이름은 5</th>
	</tr>
	<tr>
		<td colspan="2">1-1</td>
		<td>1-2</td>
		<td>1-3</td>
		<td>1-4</td>
	</tr>
	<tr>
		<td>2-1</td>
		<td>2-2</td>
		<td rowspan="3">2-3</td>
		<td>2-4</td>
		<td>2-5</td>
	</tr>
	<tr>
		<td>3-1</td>
		<td>3-2</td>
		<td colspan="2" rowspan="2">
			<table border="3" width="75%" align="center" bgcolor="sky blue">
			<tr>
				<th>컬럼의 이름은 1</th>
				<th>컬럼의 이름은 2</th>
				<th>컬럼의 이름은 3</th>
				<th>컬럼의 이름은 4</th>
				<th>컬럼의 이름은 5</th>
			</tr>
			<tr>
				<td colspan="2">1-1</td>
				<td>1-2</td>
				<td>1-3</td>
				<td>1-4</td>
			</tr>
			<tr>
				<td>2-1</td>
				<td>2-2</td>
				<td rowspan="3">2-3</td>
				<td>2-4</td>
				<td>2-5</td>
			</tr>
			<tr>
				<td>3-1</td>
				<td>3-2</td>
				<td colspan="2" rowspan="2">3-4</td>
			</tr>
			<tr>
				<td>4-1</td>
				<td>4-2</td>
			</tr>
			</table>
		</td>
	</tr>
	<tr>
		<td>4-1</td>
		<td>4-2</td>
	</tr>
	</table>
</body>
</html>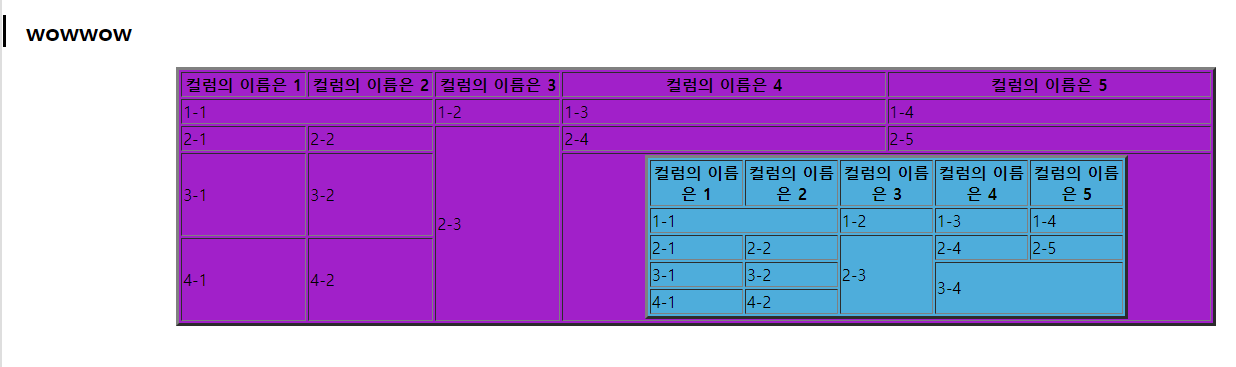
테이블 위의h2라는 태그를 직접 설정하여 제목앞에 보기 편하게 border를 달았다.
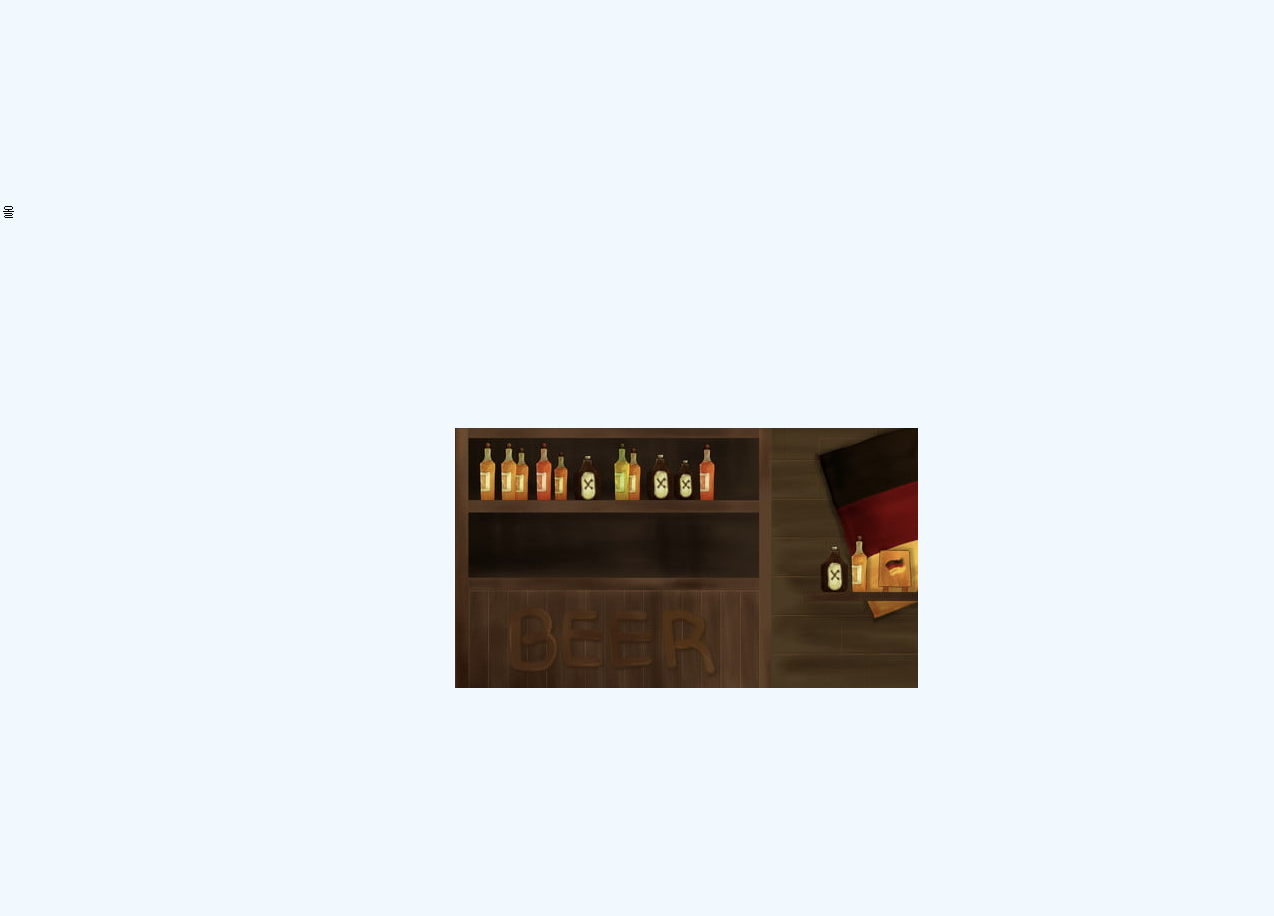
Background
말그대로 배경화면을 뜻한다
<!DOCTYPE html>
<html>
<head>
<meta charset="UTF-8">
<title>배경 만들래요</title>
<style>
	body{
	background-color:aliceblue;
	background-image:url("./image/bar.jpg");
	background-repeat:no-repeat;
	background-position: center;
	background-attachment: scroll;}
</style>
</head>
<body>
<xmp>

올

</xmp>

</body>
</html>
color : 배경색 (색입력)
img : 배경에 사용할 이미지 (url 주소 입력)
repeat : 이미지가 배경의 전체에 맞지 않을 경우 반복여부 (no-repeat / repeat-x / repeat-y)
position : 이미지의 위치 (bottom / left / right / center / top)
attachment : 스크롤을할때 이미지가 따라올지 고정된채로 있을지 여부 (fixed / scroll)
Border
Content의 테두리를 정하는 요소이다.
1. border-width (선의 두께): Content의 테두리 선의 두께
값>값> px, em, rem 등 단위
2.border-style (선의 스타일)::Content 테두리 선의 스타일
값 > none, solid, dashed, dotted 등
3. border-color (선의 색상): Content 의 테두리 선의 색상을 지정
값 > 색상 키워드, HEX 코드, RGB 값 등 (예: border-color: red;)
4. border-radius (테두리의 모서리 반경) : Content의 테두리의 모서리를 둥글게 만듬
값 > px, em, % 등 단위 (예: border-radius: 5px;)
5. border-collapse (테두리 병합): 테이블에서 사용되며, 인접한 테두리를 병합할지 분리할지를 결정
값 > collapse, separate (예: border-collapse: collapse;)
6. border-image (이미지를 사용한 테두리):이미지를 사용하여 Content의 테두리를 꾸민다.
값> 이미지 경로, 슬라이스 영역, 스트레치 영역 등 (예: border-image: url(border.png) 30 round;)
.
'Web > JSP국비지원 수업 정리' 카테고리의 다른 글
| Web 6일차 수업내용(javascript이어서 + jquery) (0) | 2023.06.26 |
|---|---|
| Web 5일차 수업내용(form / input / javascript function / js로 유효성 검사) (0) | 2023.06.23 |
| Web 4일차 수업내용 (폼만들기, input, javascript 살짝) (0) | 2023.06.22 |
| Web 2일차 수업내용 ( table마무리/이미지와 하이퍼링크) (0) | 2023.06.20 |
| Web 1일차 수업내용 (tomcat서버 연결 / html 문법1) (0) | 2023.06.19 |